Quick start
Your first ten minutes with FRIZZ. Every detail is in the manual.
How the sound flows
Section titled “How the sound flows”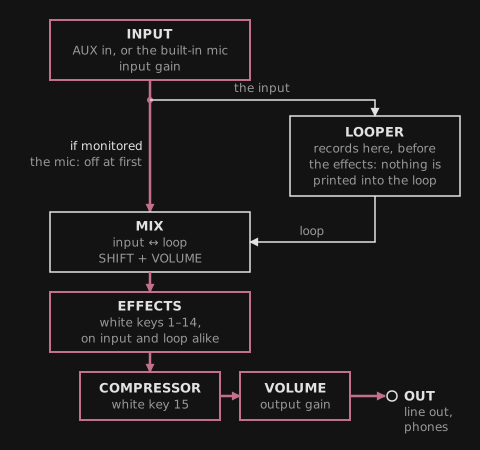
Plug a source into AUX. The looper records it before the effects, so you can play effects over a loop and nothing gets printed into it. The effects come after the input/loop mix, so they act on everything you hear, the input as well as the loop. No cable in AUX? Then the input is CHOMPI’s built-in microphone, which starts off the outputs so a speaker can’t feed it back (Input: AUX or the mic).
SHIFT means holding the CHOMPI key. The key lights white while it acts as SHIFT.
1. Set your levels
Section titled “1. Set your levels”| Do this | To set |
|---|---|
| Turn VOLUME | Output volume. The LED is a level meter |
| Press VOLUME, then turn | Input gain, AUX’s and the mic’s each their own. The LED is the input’s meter, red where the loop would clip; while you turn, blue to red for the gain |
| Press again, then turn | Headphones: white = the master out, green = the input alone |
| Press again | Back to output volume |
| SHIFT + turn VOLUME | Input/loop mix: green = only the input, purple = only the loop |
| SHIFT + press VOLUME | Input/loop mix back to the loop only (with a loop) or the input only (without) |
Each press blinks the page’s number in white: once for output, twice for input, 3 times for the headphones.
Mono cable (TS) in AUX? See Mono input.
2. Record a loop
Section titled “2. Record a loop”- Press LOOP to start recording. LOOP turns red.
- Play something.
- Press LOOP again. The loop plays back immediately, and the input/loop mix jumps to only the loop, so you hear only the loop. Turn SHIFT + VOLUME back towards green to play along with it.
- PLAY pauses and resumes it, when you let go of it.
- Turn the big transport knob to change speed in semitones, from 2× down to 1/16×, on through a standstill and into reverse, up to −2×. Hold SHIFT while turning to jump in fifths and octaves. While paused, turning the knob scrubs. Press the knob to get back to normal speed.
- Press LOOP to erase the loop. The input/loop mix jumps back to the input. To erase at the end of the loop instead, hold PLAY and press LOOP.
In sync with a clock: with MIDI clock coming in over TRS or USB, hold PLAY and press LOOP. The recording then ends on a whole bar. Without a clock, or with the clock source set to internal on the settings page, LOOP blinks red 3 times.
A loop can be up to 2:45 long and is gone when you switch off.
3. Play the effects
Section titled “3. Play the effects”The white keys hold 13 effects, counted from the left, in the order the sound goes through them, then the chaos key and the master compressor on white key 15 (below). The chaos key makes no sound of its own: it drops the effects you’ve latched out at random and scrambles the loop’s steps (see Chaos key).
| White key | 1 | 2 | 3 | 4 | 5 | 6 | 7 | 8 | 9 | 10 | 11 | 12 | 13 | 14 | 15 |
|---|---|---|---|---|---|---|---|---|---|---|---|---|---|---|---|
| Effect | Freezer | Shifter | Folder | Crusher | Filter | Flanger | Phaser | Resonator | Slicer | Wow & flutter | Tape stop | Delay | Reverb | Chaos | Compressor |
- Hold a key: the effect is on while you hold it.
- Hold a key, then SHIFT: latch the effect on. Do it again, or just tap the key, to turn it off.
- SHIFT, then a key: pick the effect for the knobs without hearing it, to set it up before you punch it in. The key flashes.
- Knobs 1-4: shape the effect whose key you pressed or picked last. Their LEDs show the settings; a dark knob does nothing for that effect. The knobs follow one pattern: 1 is the main control, 2 the feedback, 3 the tone or colour, 4 a setting of the effect’s own, or a send’s ducking (where an effect has no such setting, it puts another one there).
- SHIFT + turn a knob: jump in big steps: notes, octaves or musical intervals where the setting has them, 10% otherwise.
- SHIFT + press a knob: reset that setting.
- Press a knob: the effect’s page 2: Mix, stereo, band and level, the same on every effect but the chaos key; press again for page 1. Knob 4 (level) tames an effect that gets loud, like the folder driven hard.
Every effect starts silent or nearly so: one knob brings it in. That’s knob 1 on most, knob 2 (feedback) on the resonator and knob 3 (amount, depth) on the flanger and the phaser. The freezer, slicer, tape stop, delay and reverb work from the first press: the freezer repeats a whole bar, the slicer pumps gently, the tape stop stops, and the delay and reverb throw echoes and a room (their level is knob 4 on their page 2, as every effect’s).
Master compressor: press white key 15, and knobs 1-4 set the compressor on the master out: threshold (off at first), ratio, attack and release; press a knob for its Mix, sidechain highpass and makeup. Its key lights up as it compresses, and turns red when the output is so loud the safety limiter has to step in. It’s always on, and FRIZZ remembers its settings when you switch off. Press an effect key to give the knobs back to the effect.
Delay and reverb tails keep ringing after you let go. The other effects stop the moment you release the key, except the tape stop, which spins back up first. Effect settings reset when you switch off, unless you save them as a scene.
Things to try first:
- Freezer (white key 1) on a beat: hold SHIFT, tap the key, and keep holding SHIFT while you turn knob 1 down 5 clicks to 1/8 (without SHIFT, a step takes 3 clicks). It grabs that much from the moment you press and repeats it while you hold the key. Turn knob 3 right 3 clicks at a time (with SHIFT, 1) for a roll: each step halves the repeat, and back at off it’s the whole length again.
- Shifter (white key 2): hold SHIFT, tap the key, and with SHIFT still held turn knob 1 up 2 clicks for a fifth, then hold the key to hear it.
- Resonator (white key 8) with the crusher or the shifter latched: the ringing goes through them on every pass.
- Phaser (white key 7): latch it, turn knob 3 (depth) up to hear the sweep and knob 2 for its resonance. Turn knob 1 right past the centre (its LED turns green) and the sweep locks to the tempo, 1/16 first, slower as you go on. With the resonator latched too, the sweep moves through its ringing.
- Delay + reverb (white keys 12 and 13): tap them to throw echoes and tails onto single notes.
- Tape stop (white key 11) with the delay or reverb latched: hold it on a beat and the music winds down over half a bar while the tails ring on. Let go and it spins back up.
The freezer, slicer, filter LFO, tape stop, delay, the phaser (its rate turned right of the centre) and the chaos key’s grid follow a tempo: the loop’s while there is one, so they lock to it; otherwise MIDI clock, or the last tempo (120 BPM at power-on). Hold SHIFT and tap LOOP 3 times or more to tap a tempo, or to tell FRIZZ how many beats a loop has. See Tempo and transport.
4. Save scenes
Section titled “4. Save scenes”5 dark keys in the middle hold scenes: every effect’s settings and latches. They go from the lower F# to the upper D#. The first is the blank scene: it turns every effect off and resets the knobs, and can’t be saved over. The other 4 are yours.
- Save: tap the upper F# (green), tap a scene key, tap the CHOMPI key to confirm.
- Recall: press a scene key. Try a busy scene on one key and a sparse one on the next, then the first key to turn every effect off.
- Morph: hold SHIFT and press a scene key, then let go of SHIFT: the effects glide there and land at the end of the bar. Before you let go, tap the key again for one bar more per tap; the bars count from when you let go.
- Drop: with SHIFT still held after the scene key, press the transport knob instead: the scene lands hard on the bar line (its key blinks red until then).
- Stop or change it: hold SHIFT again and press the blinking key to stop it where it is, or another scene key to start a new one from there.
- Copy and delete: the same steps with the upper G# (blue) and upper A# (red). Tap the function’s key again to back out.
The crossfader and the build-up come from the same SHIFT hold: see Timed scene changes.
While you save, copy or delete, the scene keys you can tap light in the function’s colour, and the CHOMPI key blinks in it when there’s something to confirm. White means done.
Scenes are stored on the SD card. See the manual for the details.
Where next
Section titled “Where next”- Manual: what every knob does on every effect
- Install guide: updating FRIZZ, going back to stock firmware